

Installation
Fusion Splicing vs Mechanical Splicing vs Connectorization
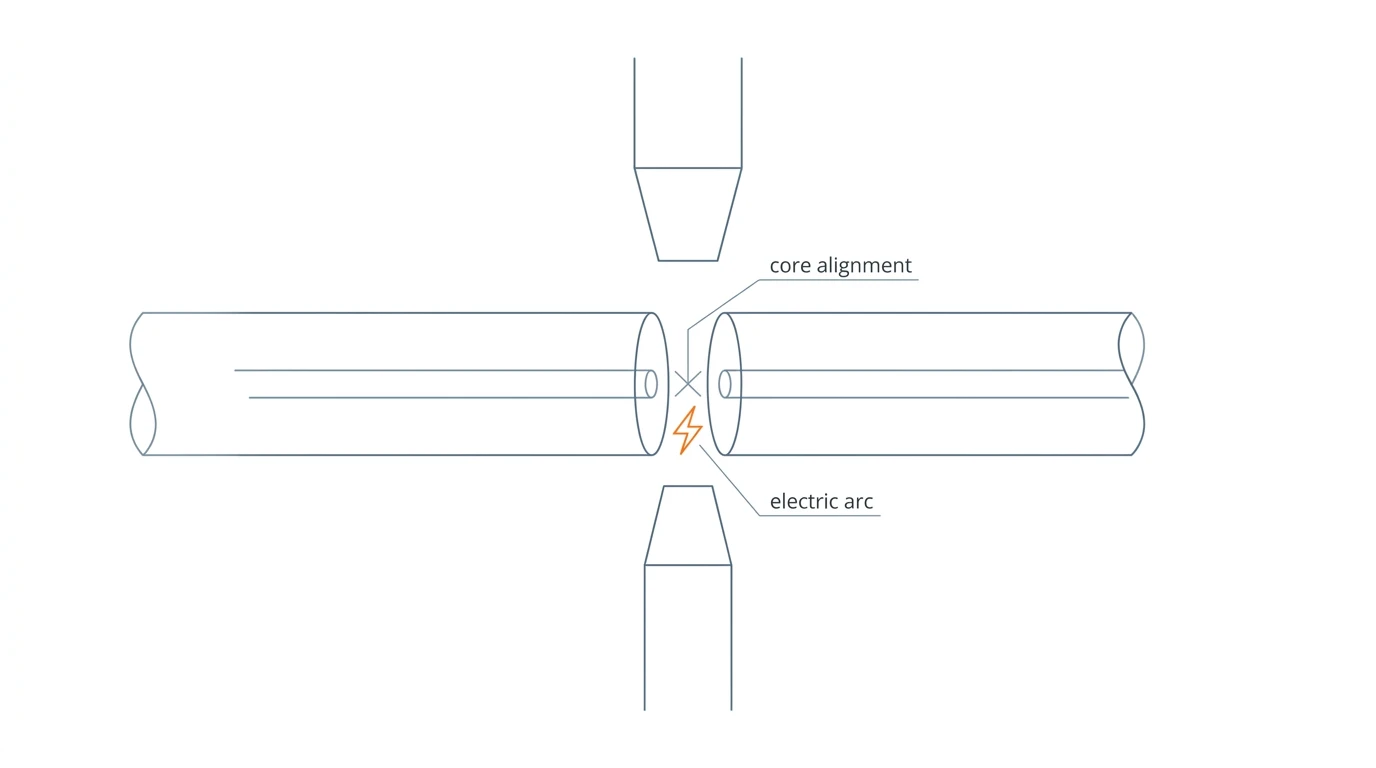
There are three ways to join fiber optic cable in the field: fusion splicing, mechanical splicing, and connectorization. Fusion welding melts the two glass ends together with an electric arc and produces the lowest loss of any joint, typically 0.02–0.05 dB. Mechanical splicing holds both ends in precise alignment inside a small gel-filled housing, running 0.2–0.5 dB. Connectorization terminates each fiber end with a polished connector and mates the pair through an adapter, also 0.2–0.5 dB per mated pair — but with the huge advantage that the joint can be unplugged. None of the three is universally best. The right call depends on your loss budget, your cost structure, and whether the joint needs to be permanent. This article compares all three on loss, cost, and operations, then gives you a decision framework you can use on the next job.
Fusion Splicing vs Mechanical Splicing vs Connectorization: How to Choose
Here is the whole decision at a glance. The numbers are typical field values; your loss budget and your vendor's spec sheets are the final authority.
Factor | Fusion splicing | Mechanical splicing | Connectorization |
|---|---|---|---|
Typical loss per joint | 0.02–0.05 dB | 0.2–0.5 dB | 0.2–0.5 dB (mated pair) |
Equipment investment | $3,830–$12,150 (splicer kit) | ~$155 (splice kit) + hand tools | Termination kit or factory pre-termination |
Consumables per joint | Sleeve, a few cents | Housing, $2.95–$7.95 | Connector, a few dollars (type-dependent) |
Time per joint | ~1–3 min after prep | ~1–2 min after prep | ~2–5 min (field-installable types) |
Power needed | Yes (battery or mains) | No | No |
Can the joint be reopened? | No — permanent | No — semi-permanent | Yes — designed for repeated mating |
Service life | 20+ years in outside plant | Years, but loss drifts as gel ages | Rated in hundreds of mating cycles |
Best for | Backbones, OSP, high fiber counts | Emergency restores, low-count links | Patch panels, equipment interfaces, terminations |
The pattern to notice: fusion wins wherever the joint is permanent and loss matters; mechanical splicing wins on speed and cost in low-count, short-life situations; connectorization wins wherever someone needs to plug and unplug. Fiber optic connector types matter too — SC and LC dominate indoor and FTTH work, while ruggedized variants handle outdoor enclosures.
What Each Method Actually Does
Fusion splicing aligns two cleaved fiber ends — stripped of their 250 µm acrylate coating down to the bare 125 µm glass, cleaned, and cut with a precision cleaver — and melts them together with an electric arc so they become one continuous glass path. Modern machines align the cores automatically (core-alignment or cladding-alignment optics), estimate the loss on their display, and refuse to proceed on a bad cleave. The finished joint is protected with a heat-shrink splice sleeve before it is coiled into the splice tray. The result is the lowest loss and lowest reflectance of any fiber joint, which is why virtually all single-mode splices in outside plant are fusion; multimode fiber can be fused too, though its graded-index core is harder to match cleanly. The FOA's fusion splicing reference covers the process and the equipment from the training side.
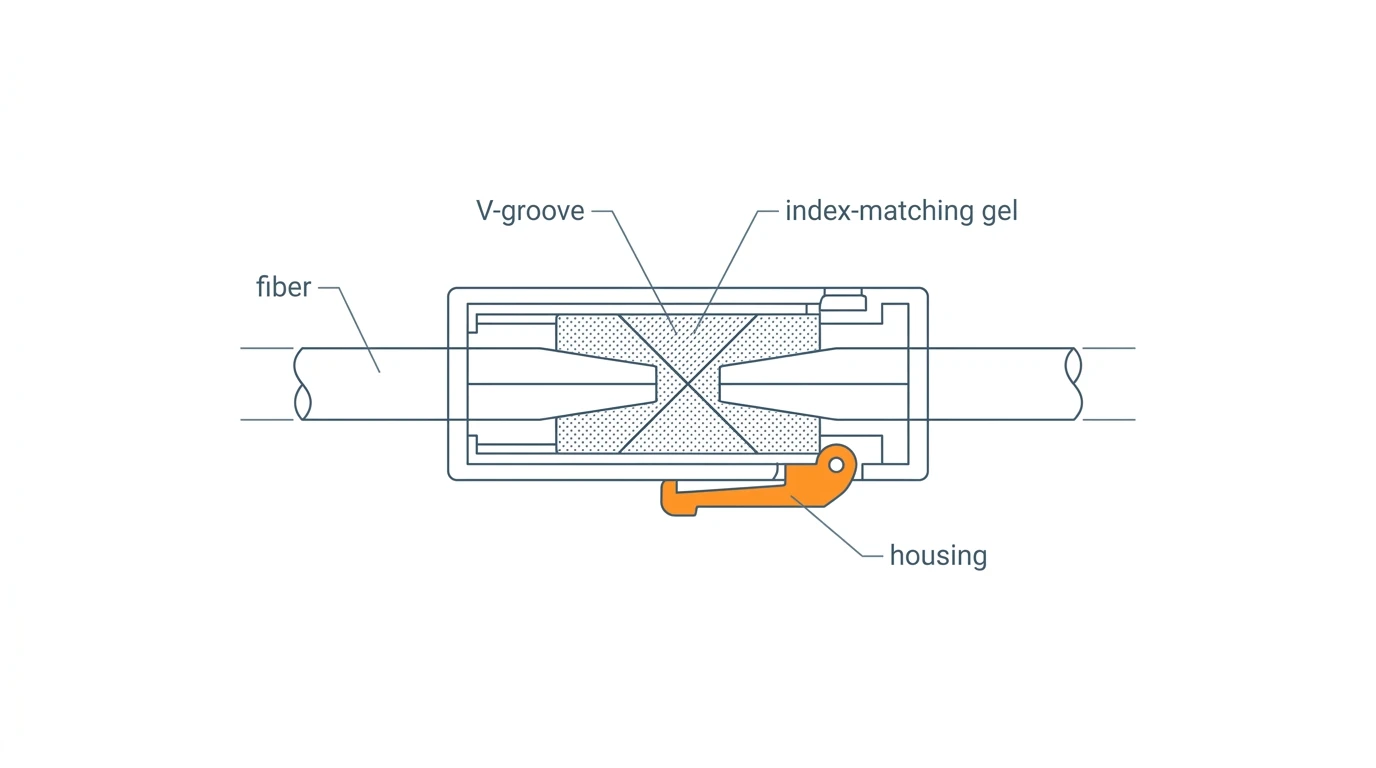
Mechanical splicing does not melt anything. Both fiber ends are stripped, cleaned, and cleaved exactly as for fusion, then inserted into a small housing that holds them in a V-groove with index-matching gel bridging the gap between the end faces. The gel keeps light moving from one fiber to the other instead of bouncing off the air gap. The housing is the joint — no power, no machine, no oven — which makes this the fastest way to restore service with a minimal tool kit. Loss is higher than fusion and depends on cleave quality, because the housing does not correct a bad end face.
Connectorization is a different category: instead of joining two cable ends, you terminate each end with a connector — a ferrule holding the fiber, polished flat or angled — and mate the two connectors through an adapter. The joint is a mated pair with an insertion loss in the same 0.2–0.5 dB range as a mechanical splice, but it is designed to be disconnected and reconnected hundreds of times. That is the property that makes connectorization the standard at patch panels, optical distribution frames, and every equipment interface. The trade-off is spelled out in the Wikipedia reference on optical fiber connectors: a connector is a demountable interface, while a splice is a permanent joint.
Splice Loss and Connector Loss: What the Numbers Mean for Your Budget
Loss is the number that decides which method you can afford to use, because every joint eats a slice of the link's loss budget.
Joint type | Typical loss | What 6 joints cost your budget |
|---|---|---|
Fusion splice | 0.02–0.05 dB | 0.12–0.30 dB |
Mechanical splice | 0.2–0.5 dB | 1.2–3.0 dB |
Connector pair | 0.2–0.5 dB | 1.2–3.0 dB (at 6 patch points) |
Run the arithmetic on a real link and the picture changes fast. A trunk with six splice points: six fusion splices at 0.05 dB eat 0.3 dB of budget; six mechanical splices at 0.3 dB eat 1.8 dB — and on a link budget that allows, say, 1.5 dB for all splices, the mechanical option is already over. Connectorization on the same link only works if those six pairs are patch points that genuinely need re-entry; using connectors purely to avoid splicing is spending loss budget you usually do not have. This is why mechanical splicing and connectorization live at the edges of the network — drops, terminations, patch fields — while fusion carries the loss-critical middle. When the numbers are marginal, measure rather than assume; the fiber optic cable testing guide walks through OTDR and OLTS verification, including how to isolate a single bad joint.
The Real Cost Difference: Equipment, Consumables, and Labor
The cost gap between the three methods is mostly an equipment gap, and it is large. These are live distributor prices verified in August 2026:
Cost item | Fusion splicing | Mechanical splicing | Connectorization |
|---|---|---|---|
Equipment | Fusion splicer kit: $3,830–$12,150 (FIS fusion splicers) | Mechanical splice kit: ~$155 (FIS mechanical splices) | Field termination kit: a few hundred $; factory pre-termination: none on site |
Consumables per joint | Splice sleeve, a few cents | Housing: $2.95–$7.95 each | Connector: a few dollars, type-dependent |
Labor per joint | Minutes | Minutes | Minutes |
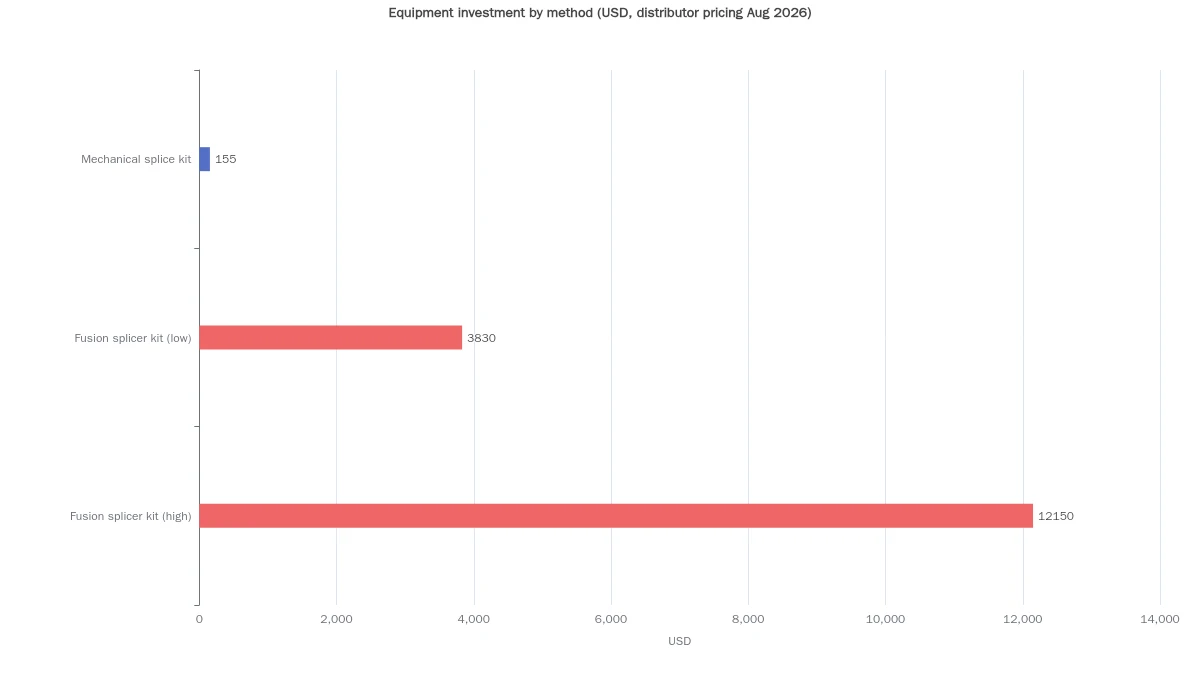
The per-splice economics flip at volume. Ten mechanical splices cost about $30–$80 in housings; ten fusion splices cost a few dollars in sleeves — but fusion requires the splicer, which starts around $3,830 for a complete kit with a cleaver. If you splice a few times a year, renting a splicer or using a contractor beats owning one. If you splice every week — FTTH rollouts, OSP repair crews, data center builds — the splicer pays for itself quickly, because the per-joint consumable cost stays near zero while mechanical housings keep costing $3–$8 per joint forever. Connectorization has the same volume logic in reverse: it is cheapest when the termination is done in a factory on pre-terminated assemblies, and most expensive when every connector is installed by hand in the field.
One cost people skip: rework. A fusion splice that reads over 0.1 dB is redone on the spot with no parts cost. A bad mechanical splice costs another housing. A contaminated connector pair costs a cleaning visit. The method with the most disciplined verification discipline — usually fusion, because the machine reports estimated loss on every splice — tends to win on total cost of ownership even where its sticker price looks worse.
Speed, Skill, and Service Life: The Operational Differences
All three methods share the same preparation: strip, clean, cleave. The differences show up in power, training, and how the joint ages.
Speed. After preparation, a fusion splice takes about 1–3 minutes per fiber (mass fusion splicers do whole 12-fiber ribbons at once), a mechanical splice 1–2 minutes, and a field-installable connector 2–5 minutes. Prep is the same for everyone, so on a 12-fiber cable the fusion advantage compounds: one machine cycle per ribbon versus twelve individual housings or connectors.
Skill. Fusion demands the most training — cleave quality, machine setup, and arc calibration all affect results, and the machine drifts over the day as electrodes wear. AFL's fusion splicing classroom is a good starting point for crew training. Mechanical splicing and field connectorization are easier to teach, which is exactly why they are the fallback on emergency crews and in markets where trained splicers are scarce. One rule applies to all three crews: stripped fiber ends are invisible glass splinters, so wear safety glasses, keep food and drink away from the work area, and dispose of offcuts in a sealed sharps container.
Service life. A properly protected fusion splice is effectively permanent — 20-plus years in outside plant is routine. Mechanical splices age: the index-matching gel dries and shifts, and loss drifts upward over years, so treat them as temporary or indoor joints with a planned service life. Connectorized joints wear mechanically — every mating cycle is a small amount of ferrule and polish wear, and the fusion splice reference and connector references both cap their expected life in the hundreds to thousands of cycles for connectors versus decades for splices.
Honest downsides. Fusion splicing has real disadvantages: the machine is expensive, needs power, must be transported carefully, and requires periodic calibration — and it is overkill for a one-fiber repair in a ceiling. Mechanical splicing's disadvantage is loss and drift: it is the wrong answer wherever the budget is tight or the joint is meant to outlast the truck that installed it. Connectorization's disadvantage is that it puts loss and contamination exposure at every interface: a dusty connector pair can cost more dB than a splice, and field-polished terminations demand clean-room-level discipline.
When to Use Each: A Decision Framework
Work through four questions and the choice mostly makes itself.
- How many fibers does the job touch? One or two — any method works. Twelve or more — fusion, and ribbon fusion if the cable is ribbon, because per-fiber cost and time collapse.
- Is the joint permanent? Yes — fusion. No, it will be reopened — connectorization. Not sure, but probably years — fusion.
- How tight is the loss budget? Tight — fusion, and verify with an OTDR. Loose, short link, temporary — mechanical is acceptable.
- What is available on site? Power and a trained splicer — fusion. A backpack and a deadline — mechanical or a fast connector.
When to choose fusion splicing
Choose fusion for outside plant backbones, any single-mode link where the budget is tight, high-fiber-count cables, and every joint you never want to visit again. Avoid it when you cannot justify the equipment or the training for a handful of joints a year — rent the machine or call a contractor instead.
When to choose mechanical splicing
Choose mechanical splicing for emergency restores, short indoor runs, low fiber counts, and any situation where a power-free joint in minutes beats a perfect joint in an hour. Avoid it for permanent OSP splices and loss-critical links: the housing cost multiplies across hundreds of fibers, and the gel will age out before the cable does. If you are about to deploy it, the step-by-step fusion and mechanical splicing guide covers both procedures in full.
When to choose connectorization
Choose connectorization everywhere a joint must open again: patch panels, distribution frames, ONTs, equipment ports. For FTTH terminations, field-installable connectors give you a connectorized end without a fusion splicer. Avoid it for inline permanent joints — you pay connector cost, connector loss, and contamination risk for a re-entry capability you will not use.
Situation | Recommended method |
|---|---|
144-fiber OSP trunk, permanent, tight budget | Fusion splicing |
4-fiber indoor run, quick repair, no power | Mechanical splicing |
12-fiber FTTH drop termination at the ONT | Connectorization (fast connector) |
Data center patch field between racks | Connectorization (factory-terminated) |
One-fiber emergency restore on a live trunk | Mechanical splice now, fusion splice later |
Splicing and Connectorization Work Together: Pigtails, Fast Connectors, and Pre-Terminated Cable
The three methods are not rivals in practice — they combine on almost every real job. The standard field pattern is the pigtail bridge: you splice a short factory-terminated pigtail onto the cable end, then plug the pigtail's connector into the patch panel. The cable gets a permanent, low-loss fusion splice; the panel gets a demountable connector; the two meet in the middle. The FOA's OSP termination reference documents this termination practice against the relevant standards.
Two options skip field splicing altogether. Fast connectors are field-installable connectors with a pre-polished stub inside: strip, cleave, insert, and the connector makes the optical joint — connectorization without a splicer, which is why they are the standard answer for FTTH terminations.
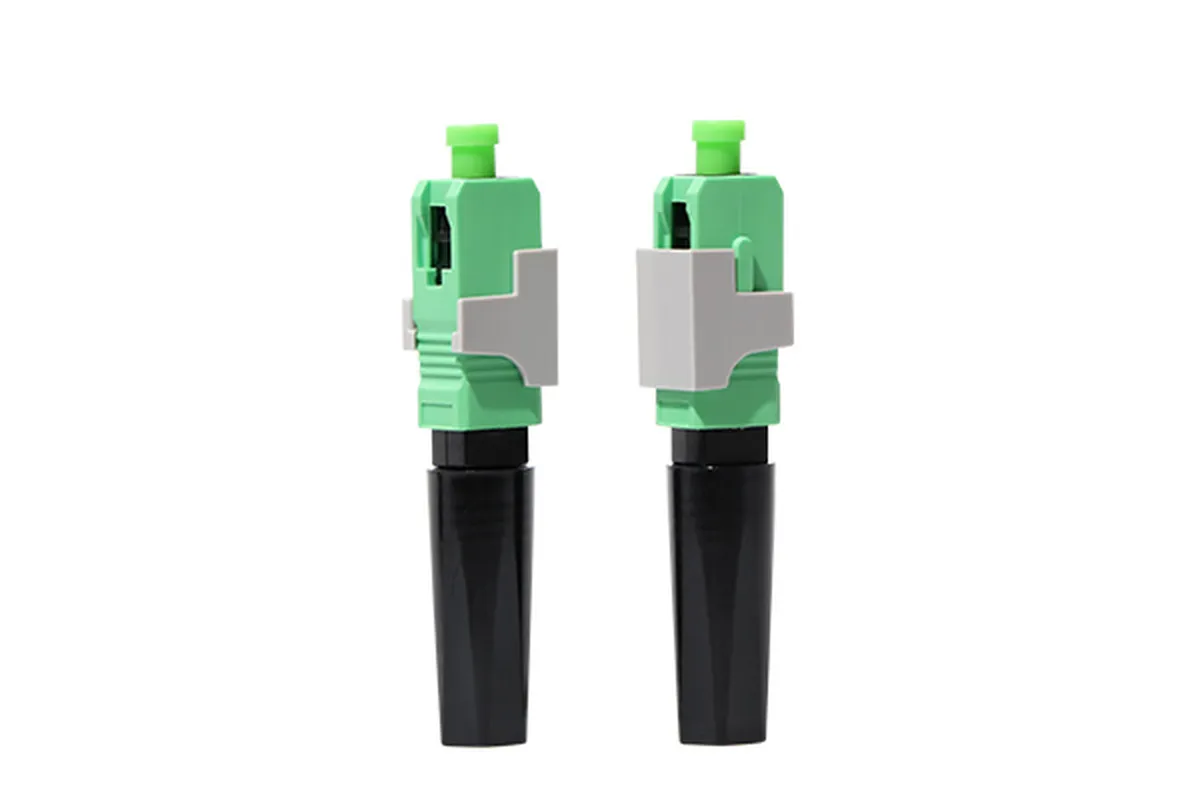
We compared their pros, cons, and install discipline in the field-installable fast connectors guide, and DYS builds SC and LC fast connectors that cover most field terminations. Pre-terminated cable moves the whole job to the factory: lengths arrive connectorized and tested, and the crew pulls, routes, and plugs — no stripping, no cleaving, no fusion, no on-site loss variance. The trade-off is planning: you must order exact lengths, and factory ends are not field-serviceable.
The decision rule from a manufacturer's side is simple. Splicing wins when the cable already exists in the ground or the wall. Connectorization wins at every interface point. Pre-terminated wins when you control the length before the job starts — and it quietly removes most of the field splices from a rollout plan.
FAQ
How long does a fusion splice last? A protected fusion splice is effectively permanent — 20-plus years in outside plant is routine, and the joint is stronger than the surrounding fiber. Mechanical splices degrade as the index-matching gel ages and should be treated as temporary or indoor joints.
What are the disadvantages of fusion splicing? Equipment cost (a splicer kit runs $3,830–$12,150), the need for power on site, periodic arc calibration, and the training required to get consistent cleaves and machine setups. For small jobs it is overkill; for volume splicing it is the most economical method there is.
What are the three types of fusion splicer technology? Core-alignment splicers align the fiber cores optically — the most accurate and most expensive, standard for single-mode work. Cladding-alignment splicers align on the outer cladding — cheaper and faster, adequate for multimode and less critical joints. Ribbon (mass fusion) splicers align and fuse an entire 12-fiber ribbon in one arc cycle.
How much does a fusion splicer cost? Complete kits with a cleaver run from about $3,830 to $12,150 at major distributors (verified August 2026), with machine-only prices at the lower end. Rental and contractor options make sense below a few splices per month.
What is the difference between splicing and connectorization? A splice is a permanent, lowest-loss joint made in the cable run; a connectorized joint is a demountable mated pair designed to be plugged and unplugged hundreds of times. Connectorization carries higher loss and contamination risk per interface, and it is the only one of the three that lets you disconnect.
Can you use splicing and connectors together? Yes — that is the standard practice. The pigtail bridge splices a factory-terminated pigtail onto the cable and plugs it into the panel, combining fusion's low loss with the connector's re-entry.
The Bottom Line: Match the Joint to the Job
Fusion splicing is the default for anything permanent and loss-critical — it is cheaper per joint at volume, unbeatable on loss, and effectively permanent. Mechanical splicing is the tool for fast, power-free, low-count repairs where "good enough for now" is the spec. Connectorization is not a splice alternative at all: it is what you use at every point that must open again, and when factory pre-termination lets you skip field joints entirely. Run the four questions — fiber count, permanence, budget, and site conditions — and the right method for each joint falls out.
If your next rollout is heavy on terminations, DYS Fiber Optic manufactures the fast connectors, pigtails, and pre-terminated assemblies that let you cut field splice counts without touching your loss budget — send your specs and compare our quoted loss data against the numbers in this guide. For the full installation and testing workflow — cable pulling, termination, and certification — the fiber optic installation and testing hub collects the field handbook as it grows.